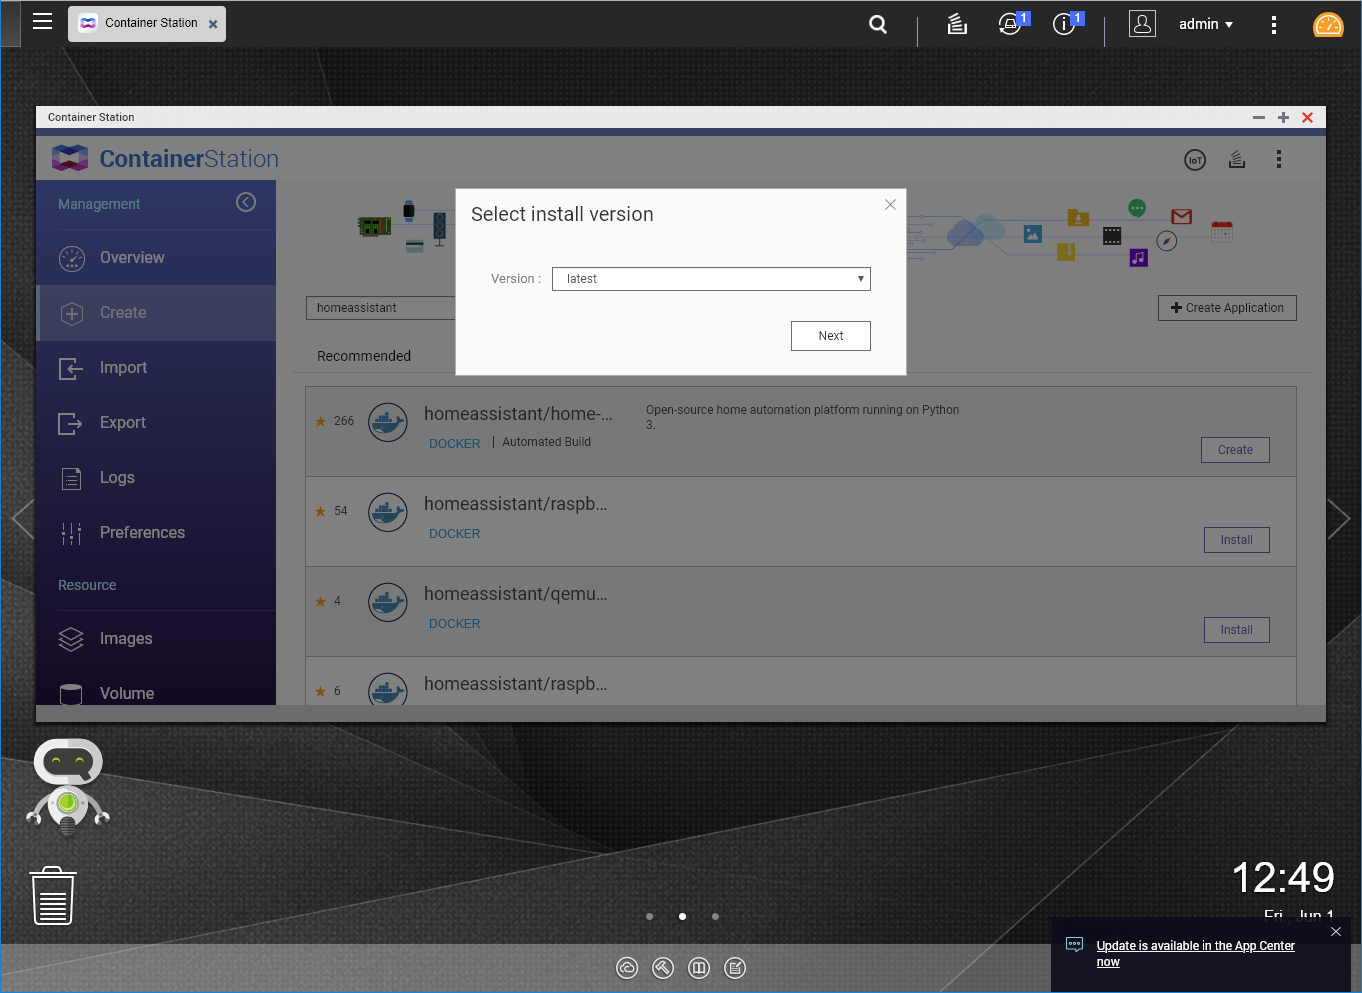
Lets begin by making the Home Assistant installation, find it on QNAP Container Station. Go to the ‘Create’ menu, search ‘homeassistant’ in the search bar, make sure you select the ‘Docker Hub’ tab as the ‘Recommended’ tab will shows an out of date version. You should see homeassistant/home-assistant click on ‘Install’ or ‘Create’.

I recommend that you manually select the highest version, ‘latest’ will choose the version you have currently installed as ‘latest’. This would help avoid getting confused, when you wish to update HomeAssistant, the latest at the moment is 0.112.4.
Add a new “TZ” environment to set your TimeZone, check out the List of tz database time zones

Set a static volume for the container to use, I just use QNAP “New Volume” directory. You can make your own volume using “Volume from host”, though I find permissions being a problem on some docker. For this example I shall make a folder ‘homeassistant-config’ that will point to the docker ‘/config’ folder.
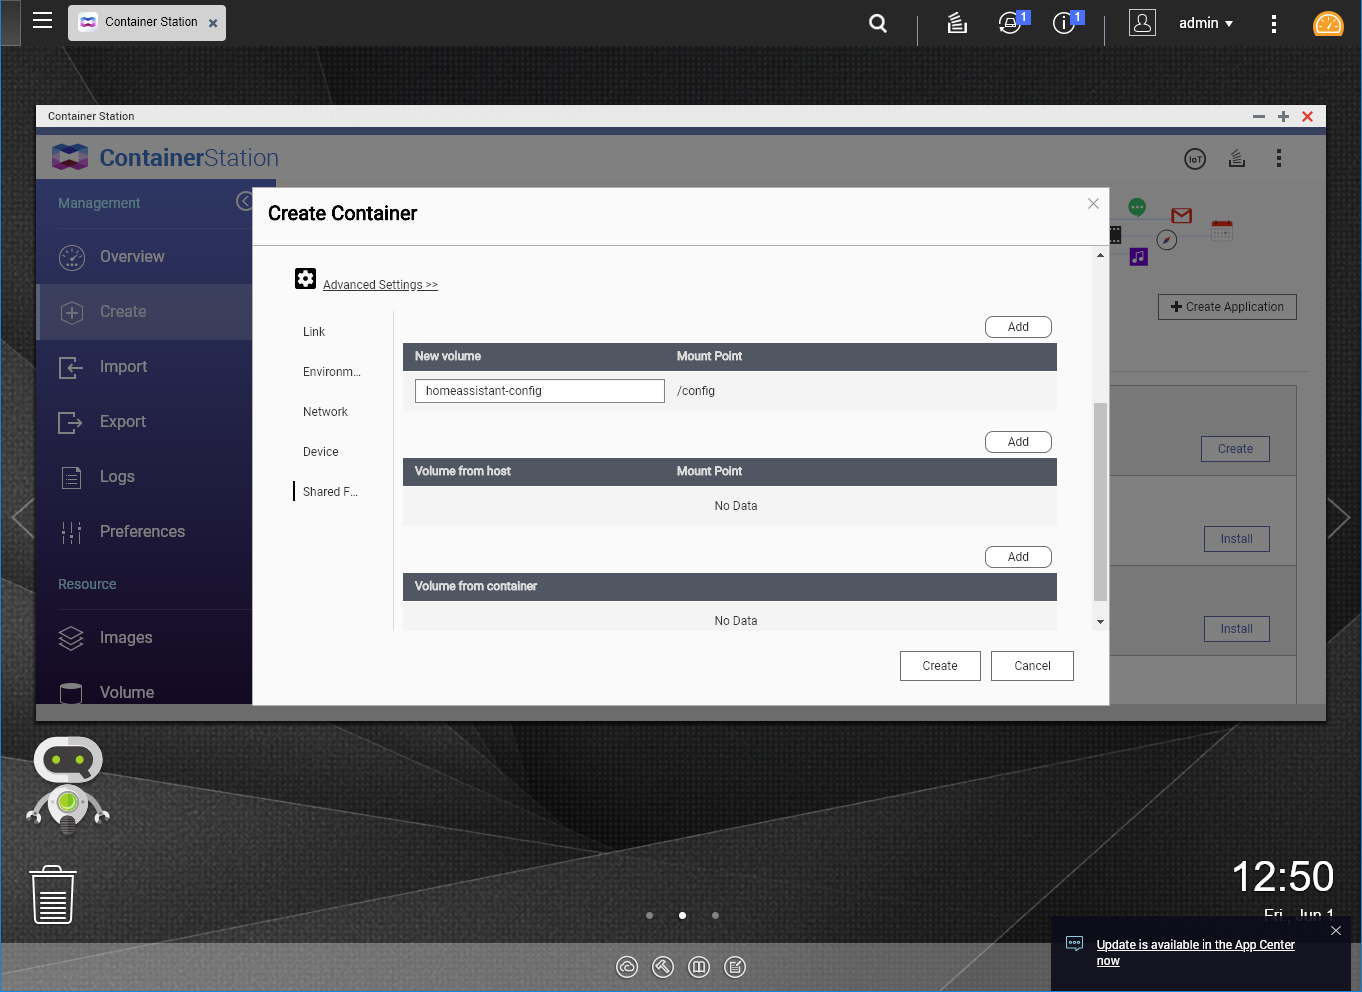
Remember to expose the container 8123 port to any host port, can set it as 8123 if you wish.

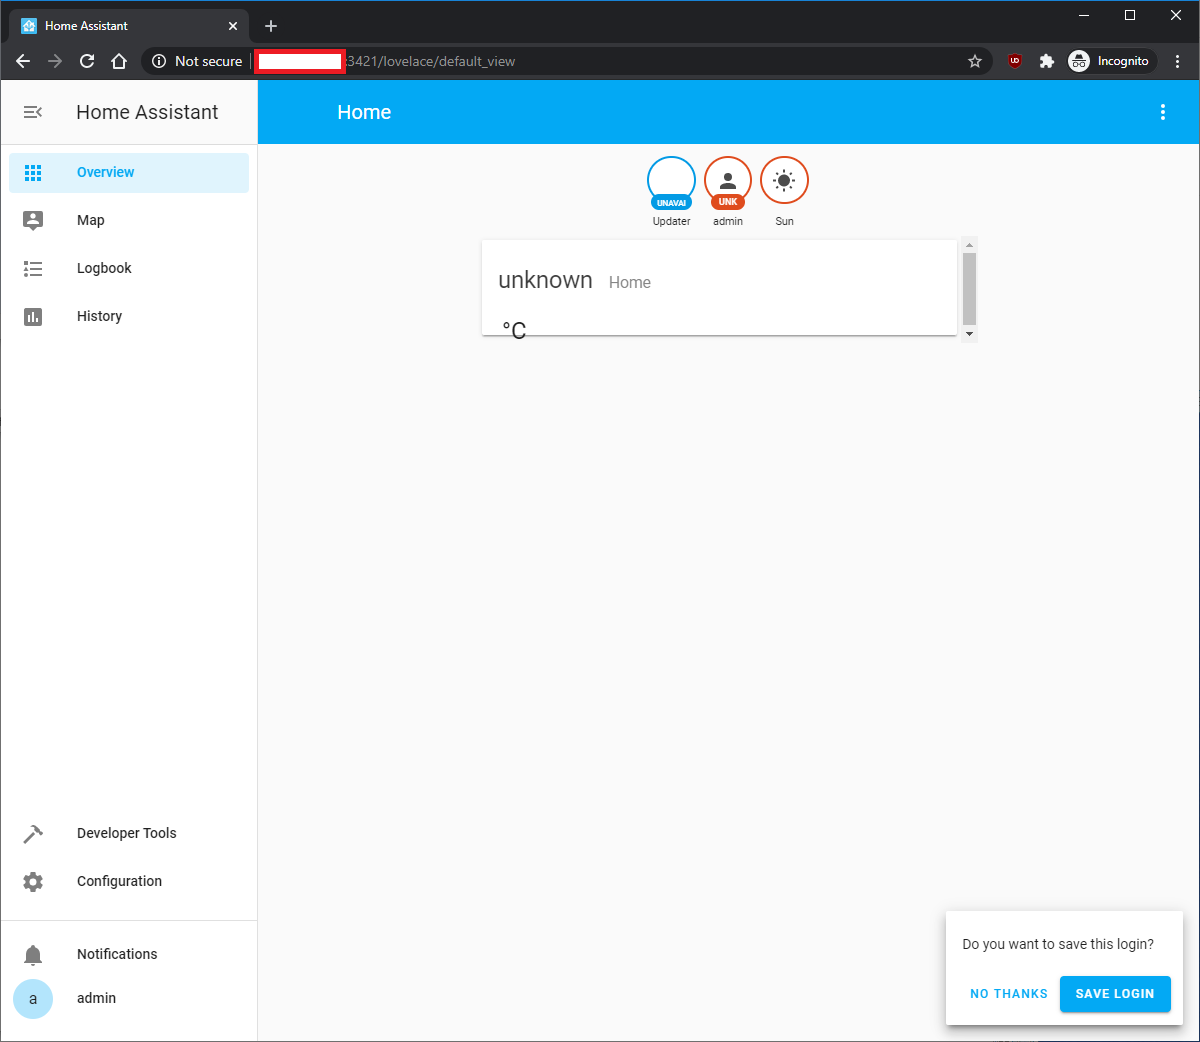
You should have the basic installation ready at [I.P Address]:[Port].

You now have HomeAssistant running.
Add QNAP Sensor
What do HomeAssistant do for you and your QNAP? You can have it to monitor multiple QNAP all in one place, let me show you how.
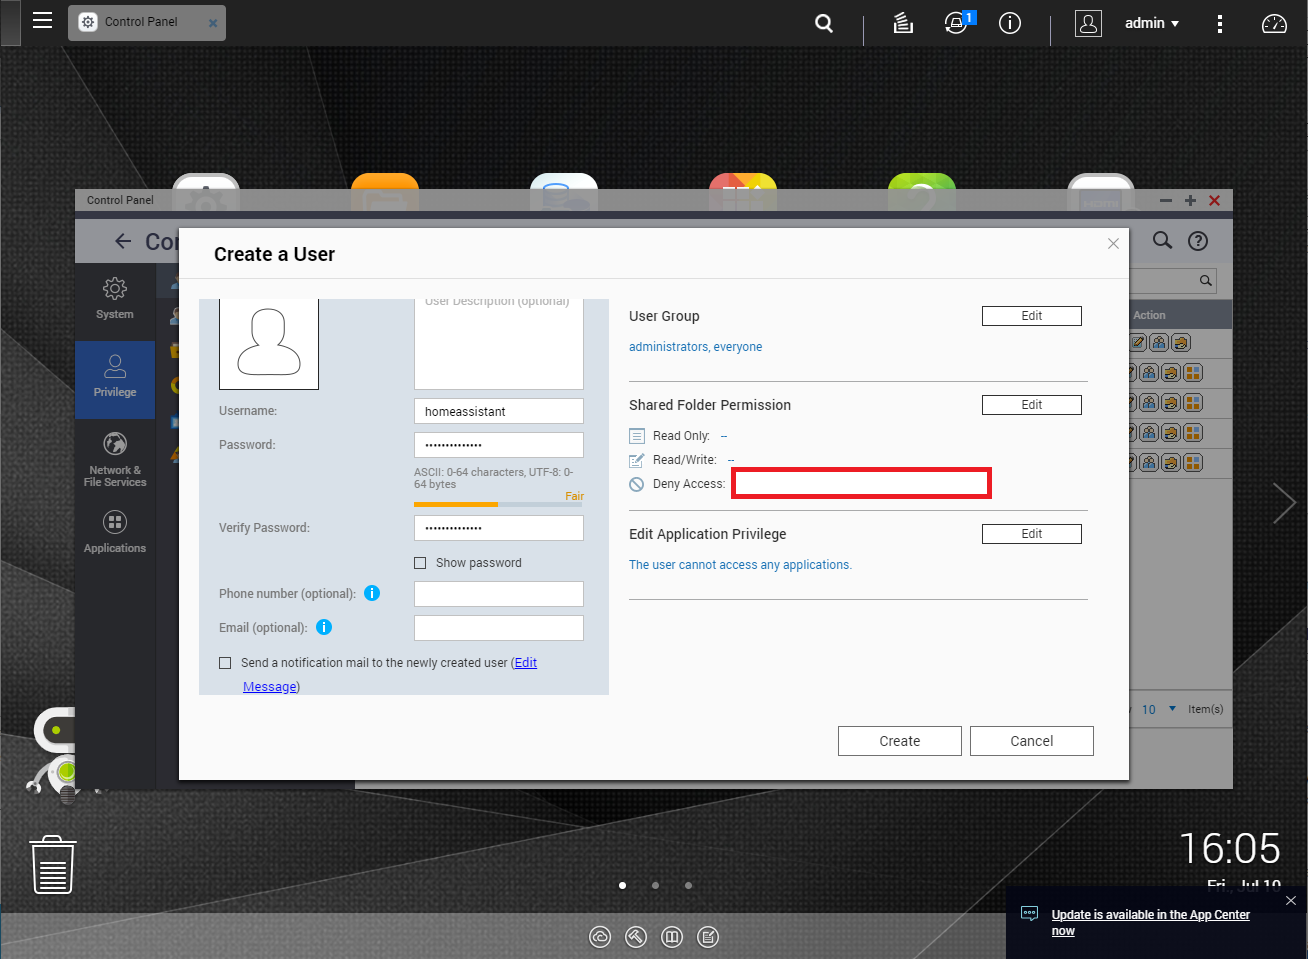
You need to create a homeassistant account that is admin, it doesn’t need any other access but just being admin. So you can deny all “Application Privileged” and “Shared Folder Permissions”. This account will be used for HomeAssistant to login and check the status of the device.
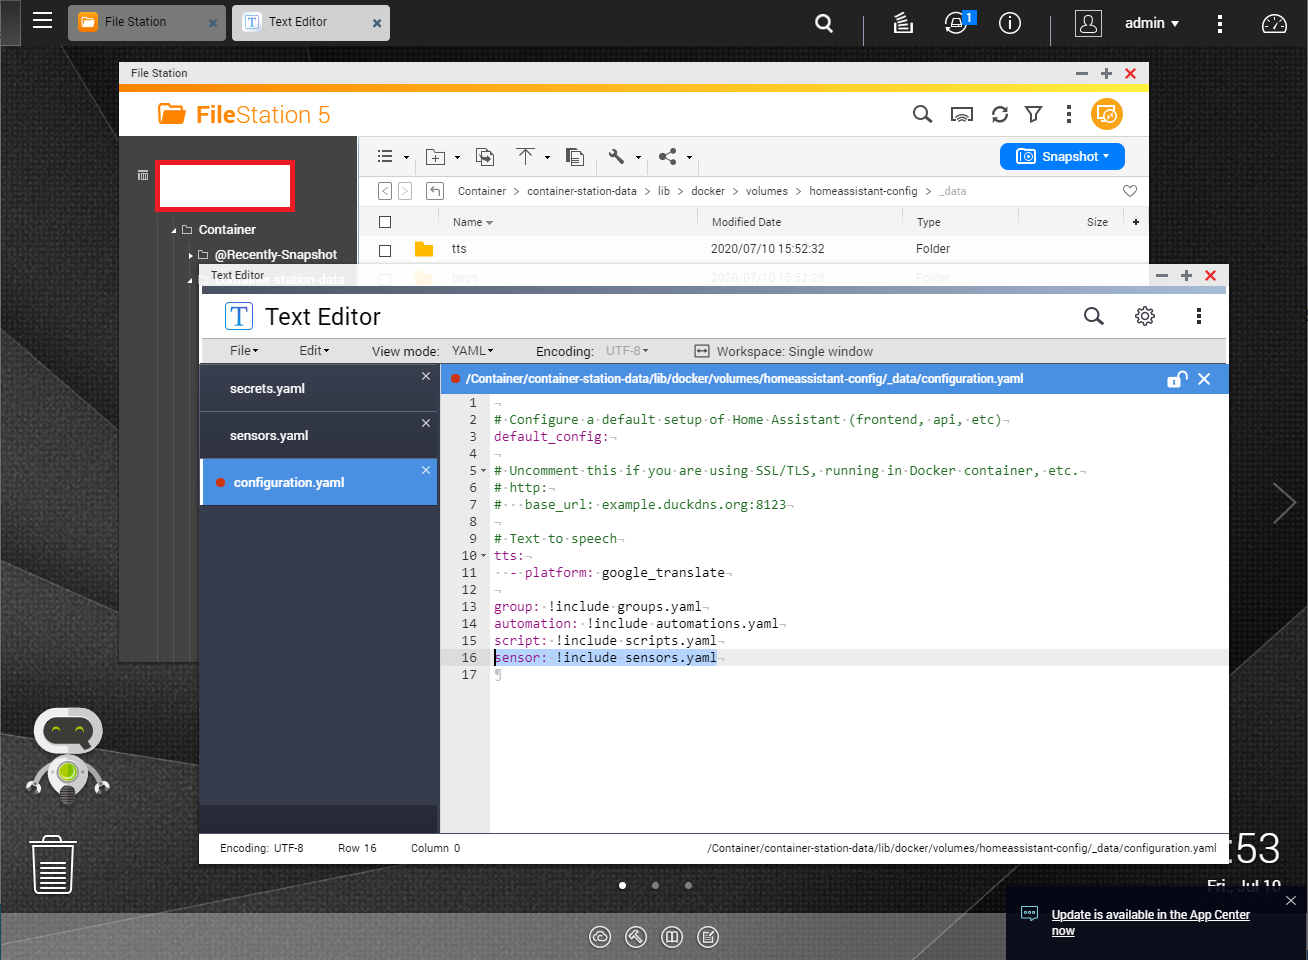
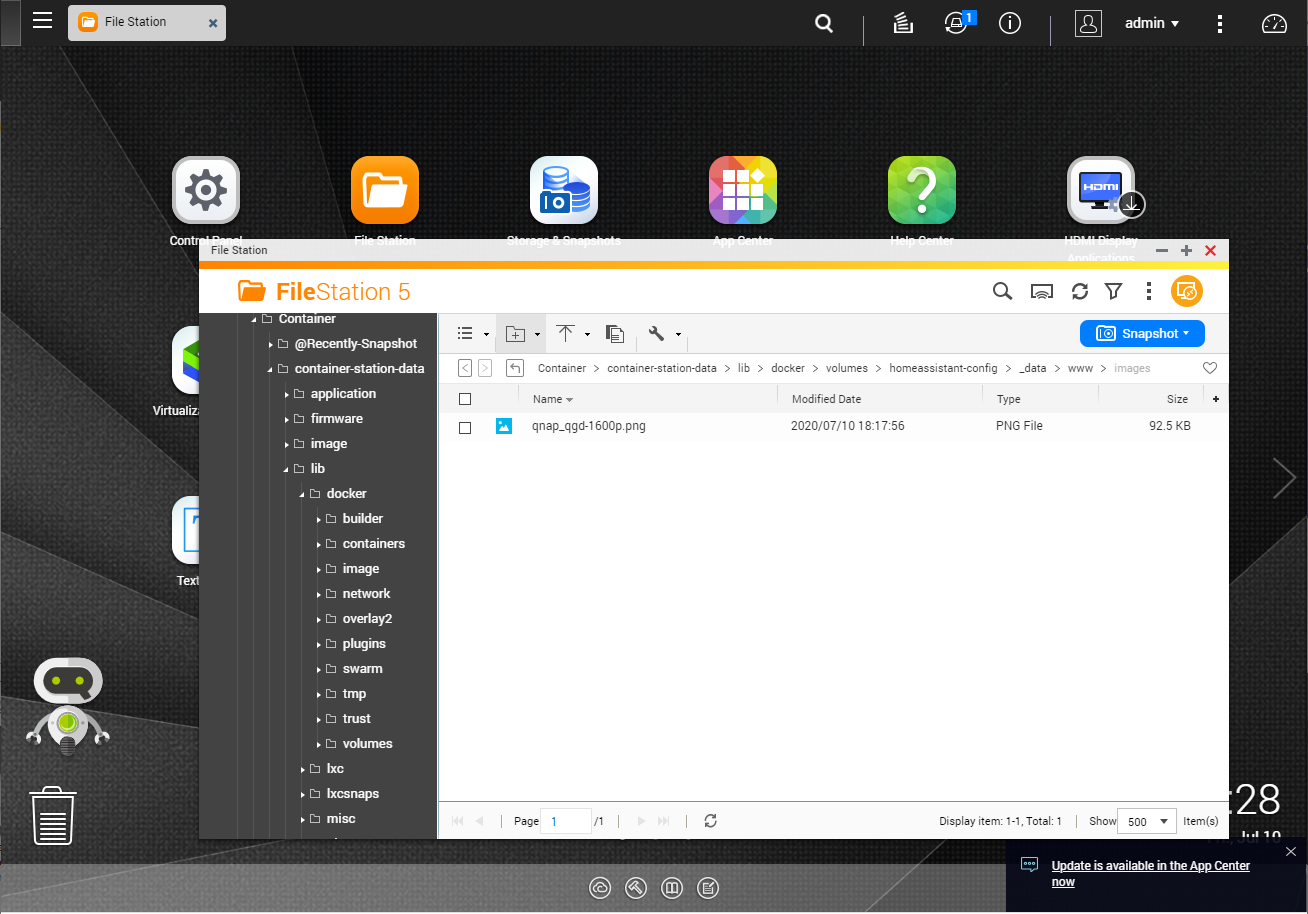
Go to FileStation and get to the homeassistant-config volume, it is located in a nested directory.
Container/container-station-data/lib/docker/volumes/homeassistant-config/_data
We need to add the user details for HomeAssistant, it is best to put these details in the ‘secrets.yaml’.

qnap_1_host: [ip_address]
qnap_1_username: [username]
qnap_1_password: [password]
qnap_1_port: [port]
qnap_1_ssl: false
qnap_1_verify_ssl: false

Create a new yaml file called sensors.yaml, easier to just copy and paste any yaml file and rename it. The sensors file is used to provide any sensor device for HomeAssistant to monitor, for example we want to use the QNAP integration sensor. https://www.home-assistant.io/integrations/qnap/

For good practices do not put your configurations such as username and password outside of the secret file, otherwise it can be read in plain text. HomeAssistant will know that ‘!secret” means to get the config parameter from the secrets.yaml file. You can use ‘#’ to comment out unneeded things to monitor.
  - platform: qnap
    host: !secret qnap_1_host
    port: !secret qnap_1_port
    username: !secret qnap_1_username
    password: !secret qnap_1_password
    ssl: !secret qnap_1_ssl
    verify_ssl: !secret qnap_1_verify_ssl
    monitored_conditions:
      - status
      - system_temp
      - cpu_temp
      - cpu_usage
      - memory_free
      - memory_used
#      - network_tx
#      - network_rx
      - drive_temp
      - volume_size_free
      - volume_size_used

Edit the configuration file to include the sensors.yaml file for sensor.
sensor: !include sensors.yaml
Restart HomeAssistant, either through HomeAssistant by Configuration>Server Control>Restart or just restart the container.

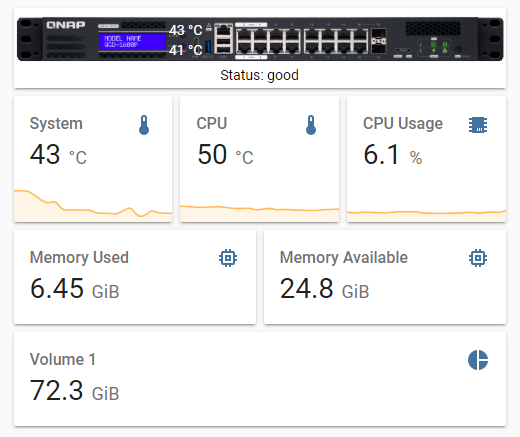
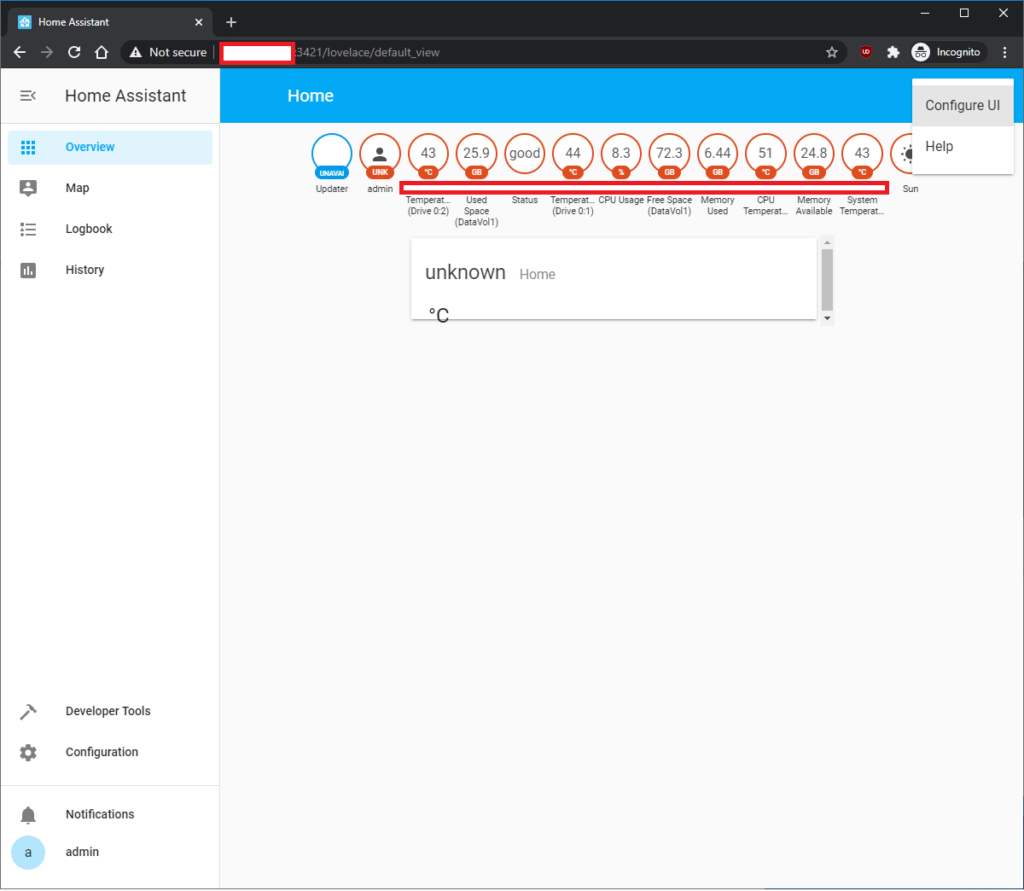
You should see all the sensors available for your QNAP

You can make the interface much better by ‘Configure UI’
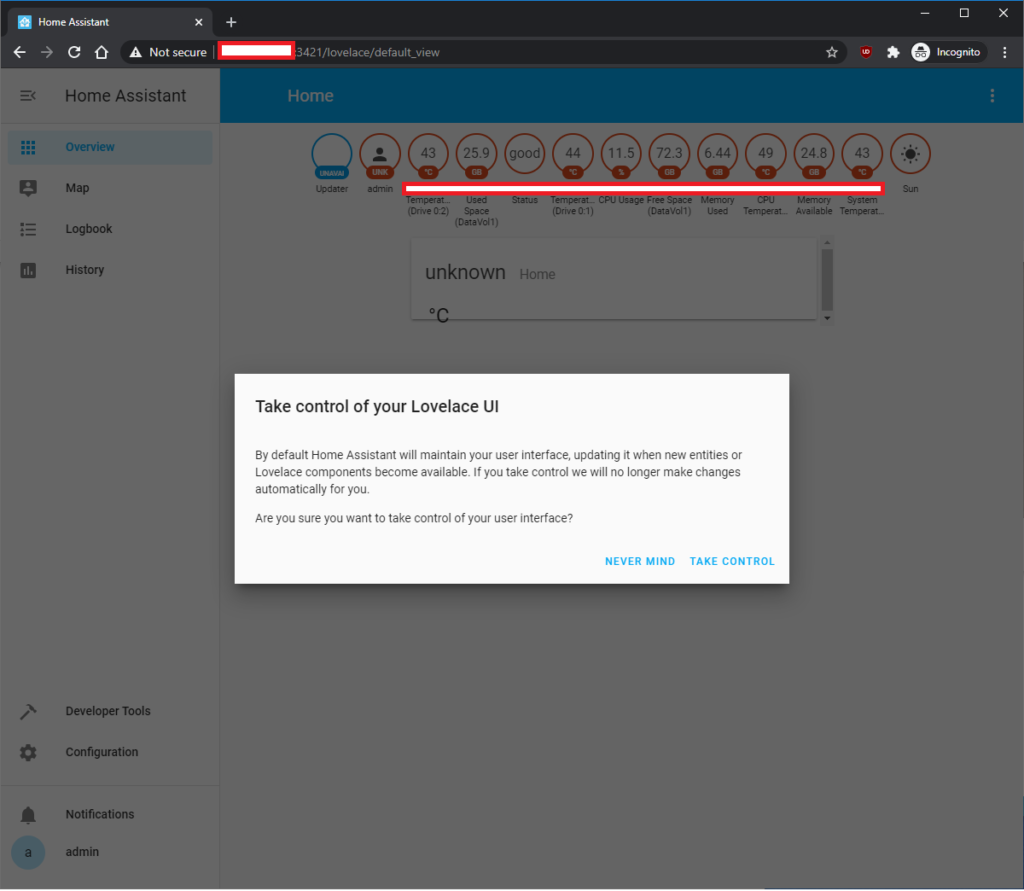
It will warn you that HomeAssistant will manage the layout for you, just press ‘Take Control’
First step add ‘Gauge’ card.
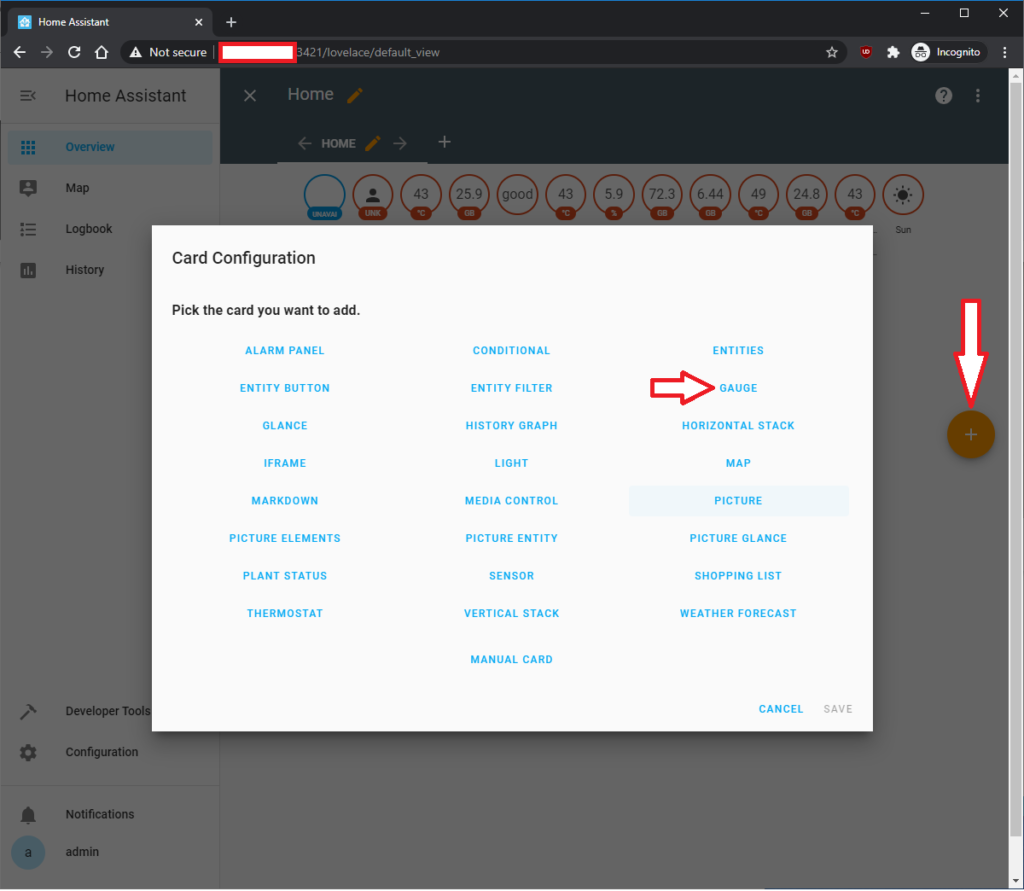
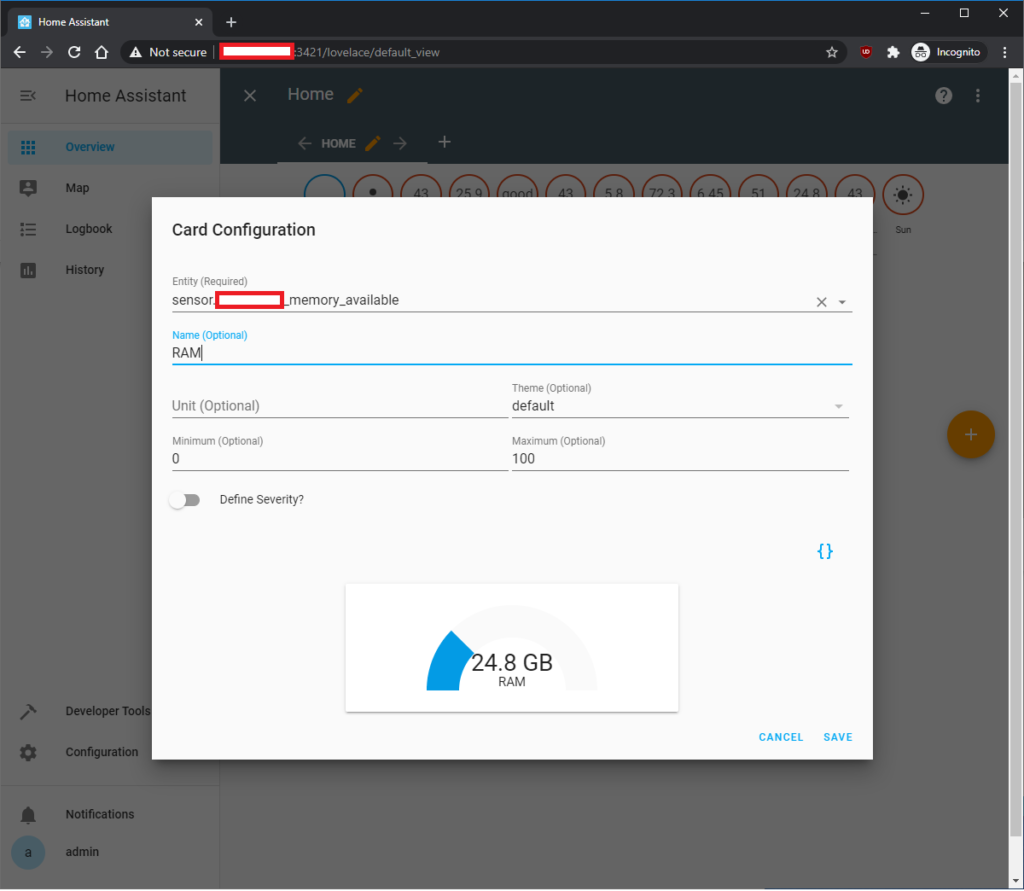
You will be able to select which ever entity of the sensor to display as a gauge, RAM and Volumes are great to be displayed as gauges but it’s personal preference.
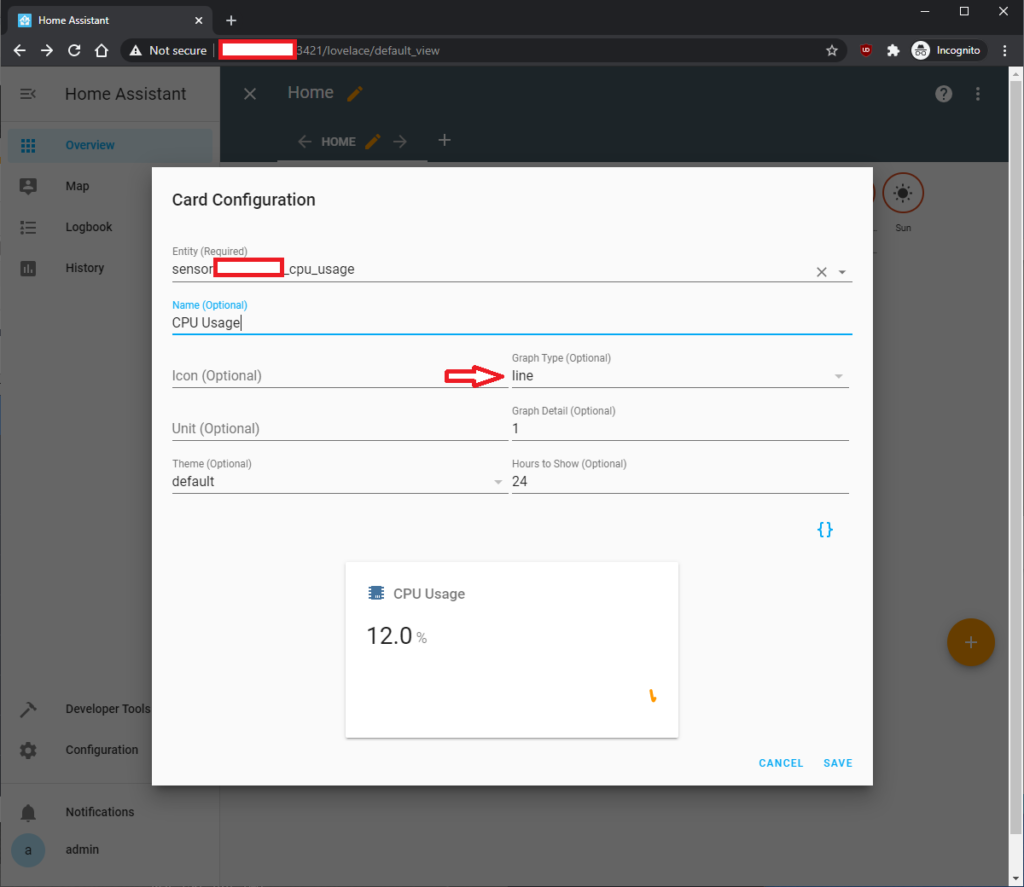
How about displaying CPU temperature, we can just use a sensor card.
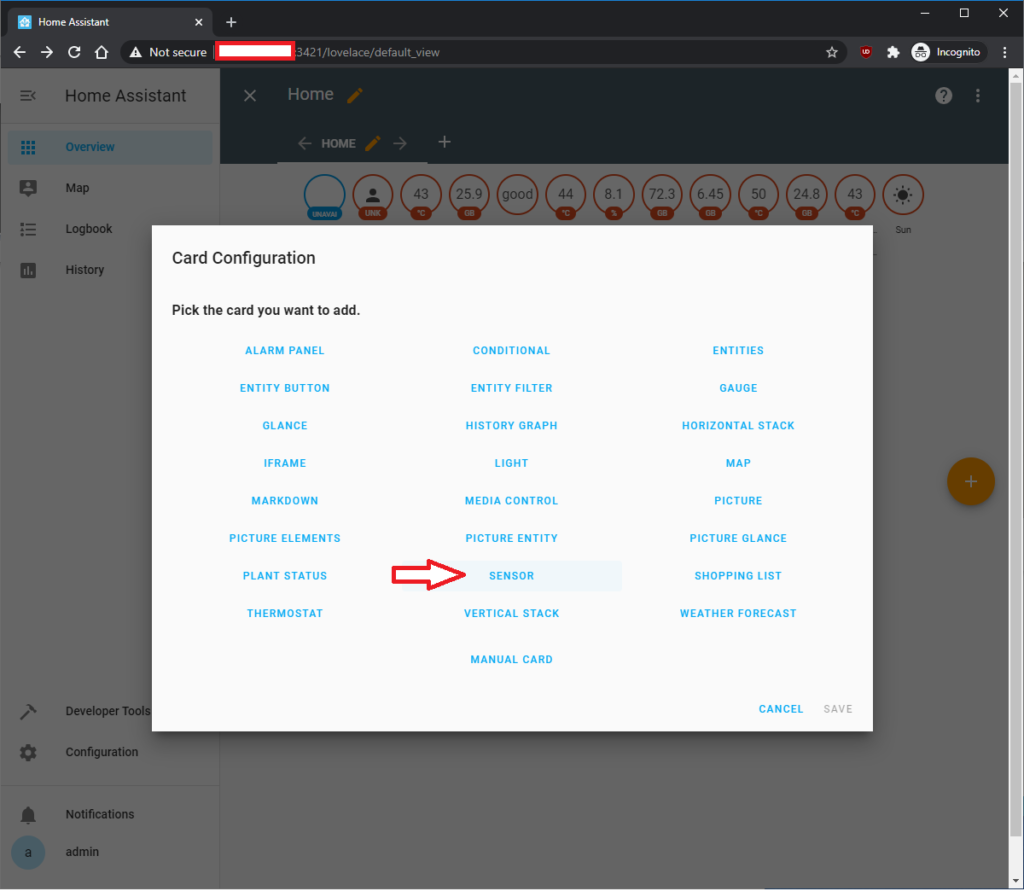
This will display the temperature in a simple layout.
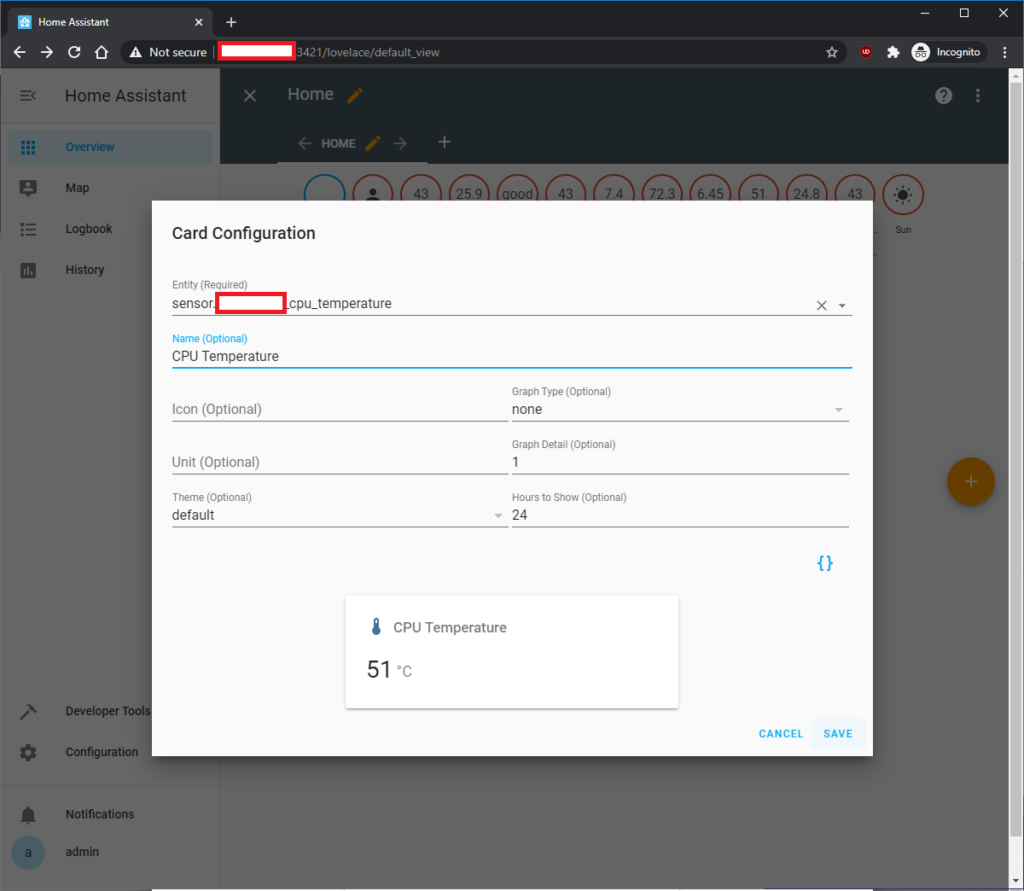
I prefer to have a line graph for extra details.
Now that you understand how to add basic cards on the screen, the cards seems to waste alot of space for one card. There is the horizontal stack that you can used to group these cards.
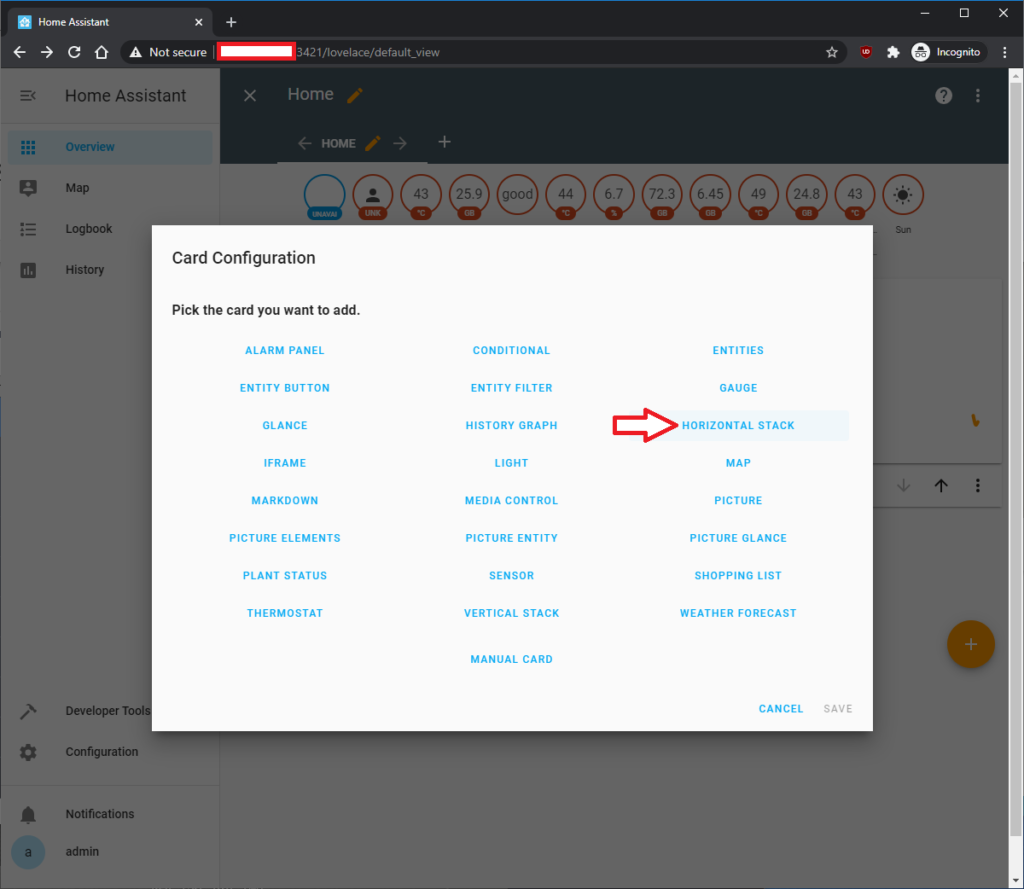
Due to the complexity of this card, you have to manually add the config yourself.
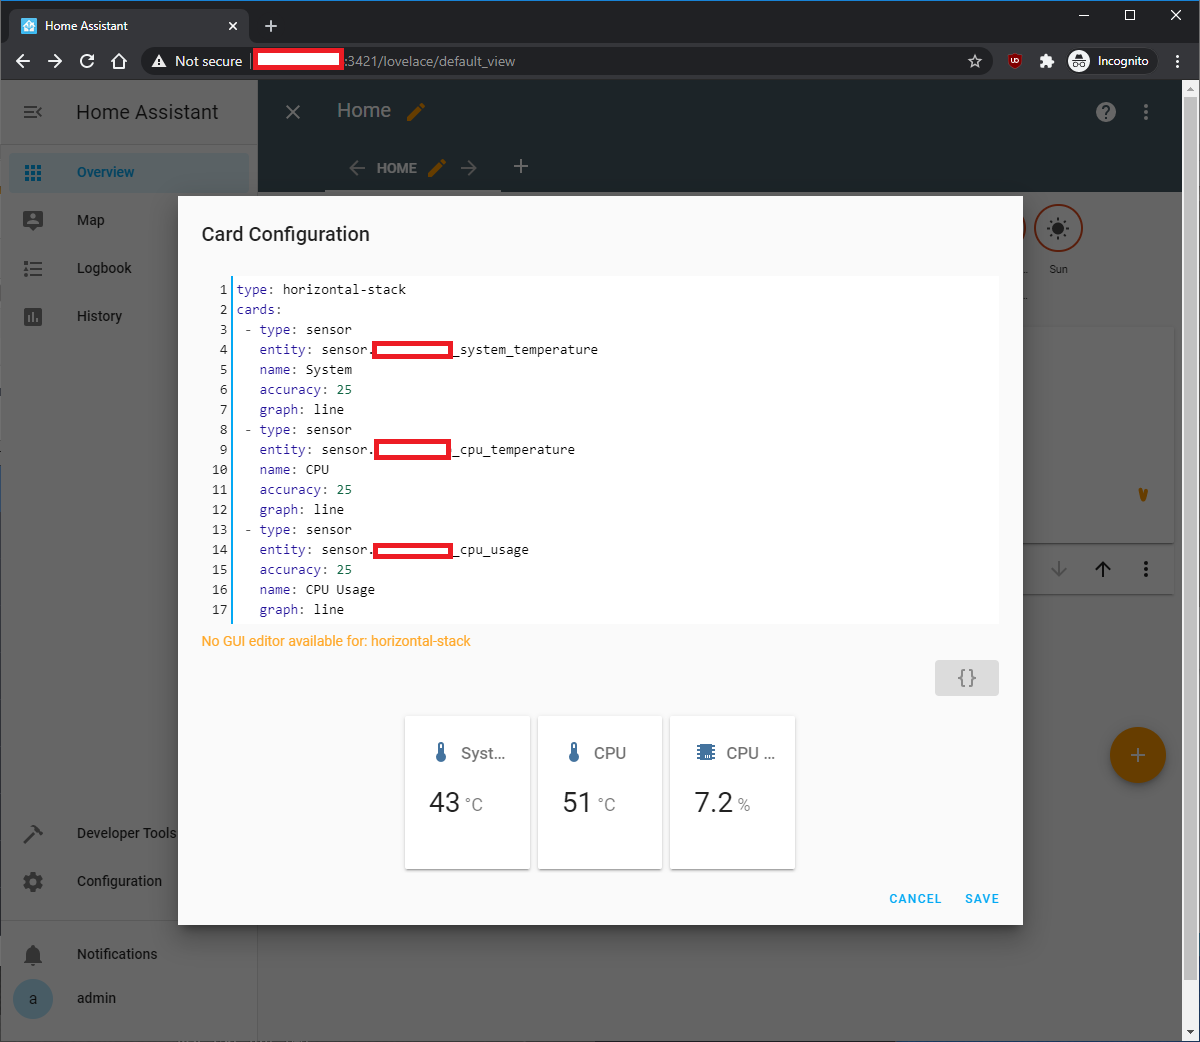
For example to show the System Temp, CPU Temp and CPU load you add this:
type: horizontal-stack
cards:
  - type: sensor
    entity: sensor.[name]_system_temperature
    name: System
    accuracy: 25
    graph: line
  - type: sensor
    entity: sensor.[name]_cpu_temperature
    name: CPU
    accuracy: 25
    graph: line
  - type: sensor
    entity: sensor.[name]_cpu_usage
    name: CPU Usage
    accuracy: 25
    graph: line
If you want to go crazy you can use ‘Picture Elements’ to have image background with entity on top. Here’s example how I set up my QNAP switch summary cards.

Save this image, and put them in the ‘homeassistant-config’ folder, and then you make ‘www’ folder and then an ‘images’ folder
Make a ‘Horizontal Stack’ card in manual, here is a conditional element to check if the entity exist before displaying. Useful in prevent empty bays being displayed.
type: horizontal-stack
cards:
  - type: picture-elements
    image: /local/images/qnap_qgd-1600p.png
    elements:
      - type: conditional
        conditions:
          - entity: sensor.[name]_status
            state_not: unavailable
        elements:
          - type: state-label
            entity: sensor.[name]_status
            prefix: 'Status: '
            style:
              top: 85%
              left: 50%
              color: black
      - type: conditional
        conditions:
          - entity: sensor.[name]_temperature_drive_0_1
            state_not: unavailable
        elements:
          - type: state-label
            entity: sensor.[name]_temperature_drive_0_1
            prefix: ''
            style:
              top: 29%
              left: 35%
              color: white
      - type: conditional
        conditions:
          - entity: sensor.[name]_temperature_drive_0_2
            state_not: unavailable
        elements:
          - type: state-label
            entity: sensor.[name]_temperature_drive_0_2
            prefix: ''
            style:
              top: 53%
              left: 35%
              color: white

You would need to restart HomeAssistant for it to see the new ‘www/images/’ folder. Once done you get this.

Additional custom cards in another post:


Hi!,
My qnap server is running in http://192.168.0.166:8082/cgi-bin/. Home assistant is running on a dock. I can access it with http://192.168.0.166:8123/
I configure:
sensor
  - platform: qnap
    host: 192.168.0.166
    port: 8082
    username: **
    password: **
    verify_ssl: false
    monitored_conditions:
      - status
      - cpu_usage
      - memory_percent_used
But in my HA log:
Failed to fetch QNAP stats from the NAS
Traceback (most recent call last):
  File "/usr/src/homeassistant/homeassistant/components/qnap/sensor.py", line 194, in update
    self.data["system_stats"] = self._api.get_system_stats()
  File "/usr/local/lib/python3.7/site-packages/qnapstats/qnap_stats.py", line 267, in get_system_stats
    for dns in root["dnsInfo"]["DNS_LIST"]:
TypeError: 'NoneType' object is not subscriptable
Any idea??
Thanks!
Hi Rafa, your config looks correct, but can you make sure the user you have created has the administrators group. It can’t be a standard user, otherwise the API call is invalid. Hope that helps
Hi,
first thank you for making this installation very simple with clear explanation !
just like to understand if it’s not an issue to get the HA version without the supervisor in the long run? (I’m new to HA but I noticed the qnap docker is only the core version)
Hi Symon, glad that the tutorial has helped you, the docker version has never included the supervisor, supervisor is used for standalone VM or machine where you need a supervisor to manage the security, network and installed package.
The core just work as it does for my setup for many years, it is locked within the Docker container. You can install custom cards from Home Assistant Community Store link for more contents. But due to docker being core only you can’t install any of the Home Assistant Official add-on, which are essentially apps. You just have to find a Docker of the App and link the HomeAssistant another way when using with core.
Very nice this guide.
Tested with TS-251A, no errors, but no “sensors.” created.
Is it possible to do something?
Hello Andrea, if you have already set the new user with Admin group permission, then you probably have to report a bug for your device. Report to https://github.com/colinodell/python-qnapstats
Though most people forget to assign Admin to the user, but try and get help directly from the QNAP Stat developer.
Great tutorial, thank you!
After the installation it didn’t discover any devices. I changed the network settings (and the port number) and now it works.
See here: https://community.home-assistant.io/t/integrations-not-automatically/283680/3?u=stenci
Why are you suggesting NAT rather than Host?
Hi Stefano,
I did a fresh copy and it worked just fine, from the last time I’ve tried. There was no need to complicate the tutorial for most user, but I guess making the docker into a dedicated host would ensure that you isolate the request from each other.
If anyone is having issue, they will see your comment and try it with an IP and external ports. Thank you for your feedback, much appreciate it 🙂
I followed the steps, but I get ‘404: Not Found’ whenever I try to log into the container. I am pretty sure I have opened the ports correctly.
Any thoughts?
Never mind – My issue was you can not forward the same host port to the container port, they have to be different.
Sorry for the delay just got back from a long day, it great you resolve the issue.
If you want to avoid all the issues of networking ports you can assign the HomeAssistant as a separate machine using ‘Bridge’ network mode and give it an I.P. This would help avoid network conflict with the QNAP, if you find more issues.
Glad it all resolved
Hi there!
My issue is still unsolved… maybe You can see the log ang give me some instructions?
Logger: homeassistant.components.qnap.sensor
Source: components/qnap/sensor.py:209
Integration: qnap (documentation, issues)
First occurred: 22:05:38 (7 occurrences)
Last logged: 22:16:49
Failed to fetch QNAP stats from the NAS
Traceback (most recent call last):
File “/usr/local/lib/python3.9/site-packages/urllib3/connection.py”, line 169, in _new_conn
conn = connection.create_connection(
File “/usr/local/lib/python3.9/site-packages/urllib3/util/connection.py”, line 73, in create_connection
for res in socket.getaddrinfo(host, port, family, socket.SOCK_STREAM):
File “/usr/local/lib/python3.9/socket.py”, line 953, in getaddrinfo
for res in _socket.getaddrinfo(host, port, family, type, proto, flags):
socket.gaierror: [Errno -3] Try again
During handling of the above exception, another exception occurred:
Traceback (most recent call last):
File “/usr/local/lib/python3.9/site-packages/urllib3/connectionpool.py”, line 699, in urlopen
httplib_response = self._make_request(
File “/usr/local/lib/python3.9/site-packages/urllib3/connectionpool.py”, line 394, in _make_request
conn.request(method, url, **httplib_request_kw)
File “/usr/local/lib/python3.9/site-packages/urllib3/connection.py”, line 234, in request
super(HTTPConnection, self).request(method, url, body=body, headers=headers)
File “/usr/local/lib/python3.9/http/client.py”, line 1257, in request
self._send_request(method, url, body, headers, encode_chunked)
File “/usr/local/lib/python3.9/http/client.py”, line 1303, in _send_request
self.endheaders(body, encode_chunked=encode_chunked)
File “/usr/local/lib/python3.9/http/client.py”, line 1252, in endheaders
self._send_output(message_body, encode_chunked=encode_chunked)
File “/usr/local/lib/python3.9/http/client.py”, line 1012, in _send_output
self.send(msg)
File “/usr/local/lib/python3.9/http/client.py”, line 952, in send
self.connect()
File “/usr/local/lib/python3.9/site-packages/urllib3/connection.py”, line 200, in connect
conn = self._new_conn()
File “/usr/local/lib/python3.9/site-packages/urllib3/connection.py”, line 181, in _new_conn
raise NewConnectionError(
urllib3.exceptions.NewConnectionError: : Failed to establish a new connection: [Errno -3] Try again
During handling of the above exception, another exception occurred:
Traceback (most recent call last):
File “/usr/local/lib/python3.9/site-packages/requests/adapters.py”, line 439, in send
resp = conn.urlopen(
File “/usr/local/lib/python3.9/site-packages/urllib3/connectionpool.py”, line 755, in urlopen
retries = retries.increment(
File “/usr/local/lib/python3.9/site-packages/urllib3/util/retry.py”, line 574, in increment
raise MaxRetryError(_pool, url, error or ResponseError(cause))
urllib3.exceptions.MaxRetryError: HTTPConnectionPool(host=’http’, port=80): Max retries exceeded with url: //192.168.0.7:1907/cgi-bin/authLogin.cgi (Caused by NewConnectionError(‘: Failed to establish a new connection: [Errno -3] Try again’))
During handling of the above exception, another exception occurred:
Traceback (most recent call last):
File “/usr/src/homeassistant/homeassistant/components/qnap/sensor.py”, line 209, in update
self.data[“system_stats”] = self._api.get_system_stats()
File “/usr/local/lib/python3.9/site-packages/qnapstats/qnap_stats.py”, line 217, in get_system_stats
resp = self._get_url(
File “/usr/local/lib/python3.9/site-packages/qnapstats/qnap_stats.py”, line 74, in _get_url
self._init_session()
File “/usr/local/lib/python3.9/site-packages/qnapstats/qnap_stats.py”, line 50, in _init_session
if self._login() is False:
File “/usr/local/lib/python3.9/site-packages/qnapstats/qnap_stats.py”, line 58, in _login
result = self._execute_post_url(“authLogin.cgi”, data, False)
File “/usr/local/lib/python3.9/site-packages/qnapstats/qnap_stats.py”, line 104, in _execute_post_url
resp = self._session.post(url, data, timeout=self._timeout, verify=self._verify_ssl)
File “/usr/local/lib/python3.9/site-packages/requests/sessions.py”, line 590, in post
return self.request(‘POST’, url, data=data, json=json, **kwargs)
File “/usr/local/lib/python3.9/site-packages/requests/sessions.py”, line 542, in request
resp = self.send(prep, **send_kwargs)
File “/usr/local/lib/python3.9/site-packages/requests/sessions.py”, line 655, in send
r = adapter.send(request, **kwargs)
File “/usr/local/lib/python3.9/site-packages/requests/adapters.py”, line 516, in send
raise ConnectionError(e, request=request)
requests.exceptions.ConnectionError: HTTPConnectionPool(host=’http’, port=80): Max retries exceeded with url: //192.168.0.7:1907/cgi-bin/authLogin.cgi (Caused by NewConnectionError(‘: Failed to establish a new connection: [Errno -3] Try again’))
kind regards
Radek
Avoid using NAT network mode, just use static I.P. Doing this would minimise connection issue between the QNAP and HASS.
Have set up Home Assistant (HA) on my QNAP ca. 1/2 year ago. Back then I haven’t managed with Containerstation and so I have opted for Virtualisation Station which was much easier for me.
Just wondering out of interest:
– How reliable is HA in Containerstation? Is it easy to install updates etc. or do you always have to wait for a new Container package with every HA update (and there are many…)?
– Is it also possible to use USB devices with HA in Containerstation? (I’m e.g. using a Zwave USB Stick with HA in Virtualstation and it works just fine)?
And now my other question: I have also struggled with my QNAP sensor for HA, for a while – but the admin group membership for the HA user was the key (you can still revoke all user rights from that user but it needs to be an admin group user).
My QNAP sensor doesn’t seem to update much – whenever I restart HA then the up to date QNAP values are displayed but it then doesn’t update for days. Is there a refresh/update value you can set somewhere?
Apologies in not responding, oddly noticed your message. Home Assistant has worked for years………. even though I’ve updated the docker with the newer Home Assistant.
If Home Assistant does not update, that would mean the docker is having difficulty in communicating to the server. Which mean you should look into the network configuration, try setting an IP to the docker.
I did use to have Zwave working, until Home Assistant has dropped support for this feature. They have announced their own Zwave USB, which I haven’t bothered to look into due to lack of time.