I normally rely on Synology to do secure erase procedure on any HDD before storing or selling them. I now wish I didn’t as the drive may get locked, so I’ve wasted alot of time to test a bulk of HDD I have done in the past to ensure that they are not locked. Synology should provide a visual aid if the HDD is still locked, and provide a means to prevent the security lock still in place.
Symptoms
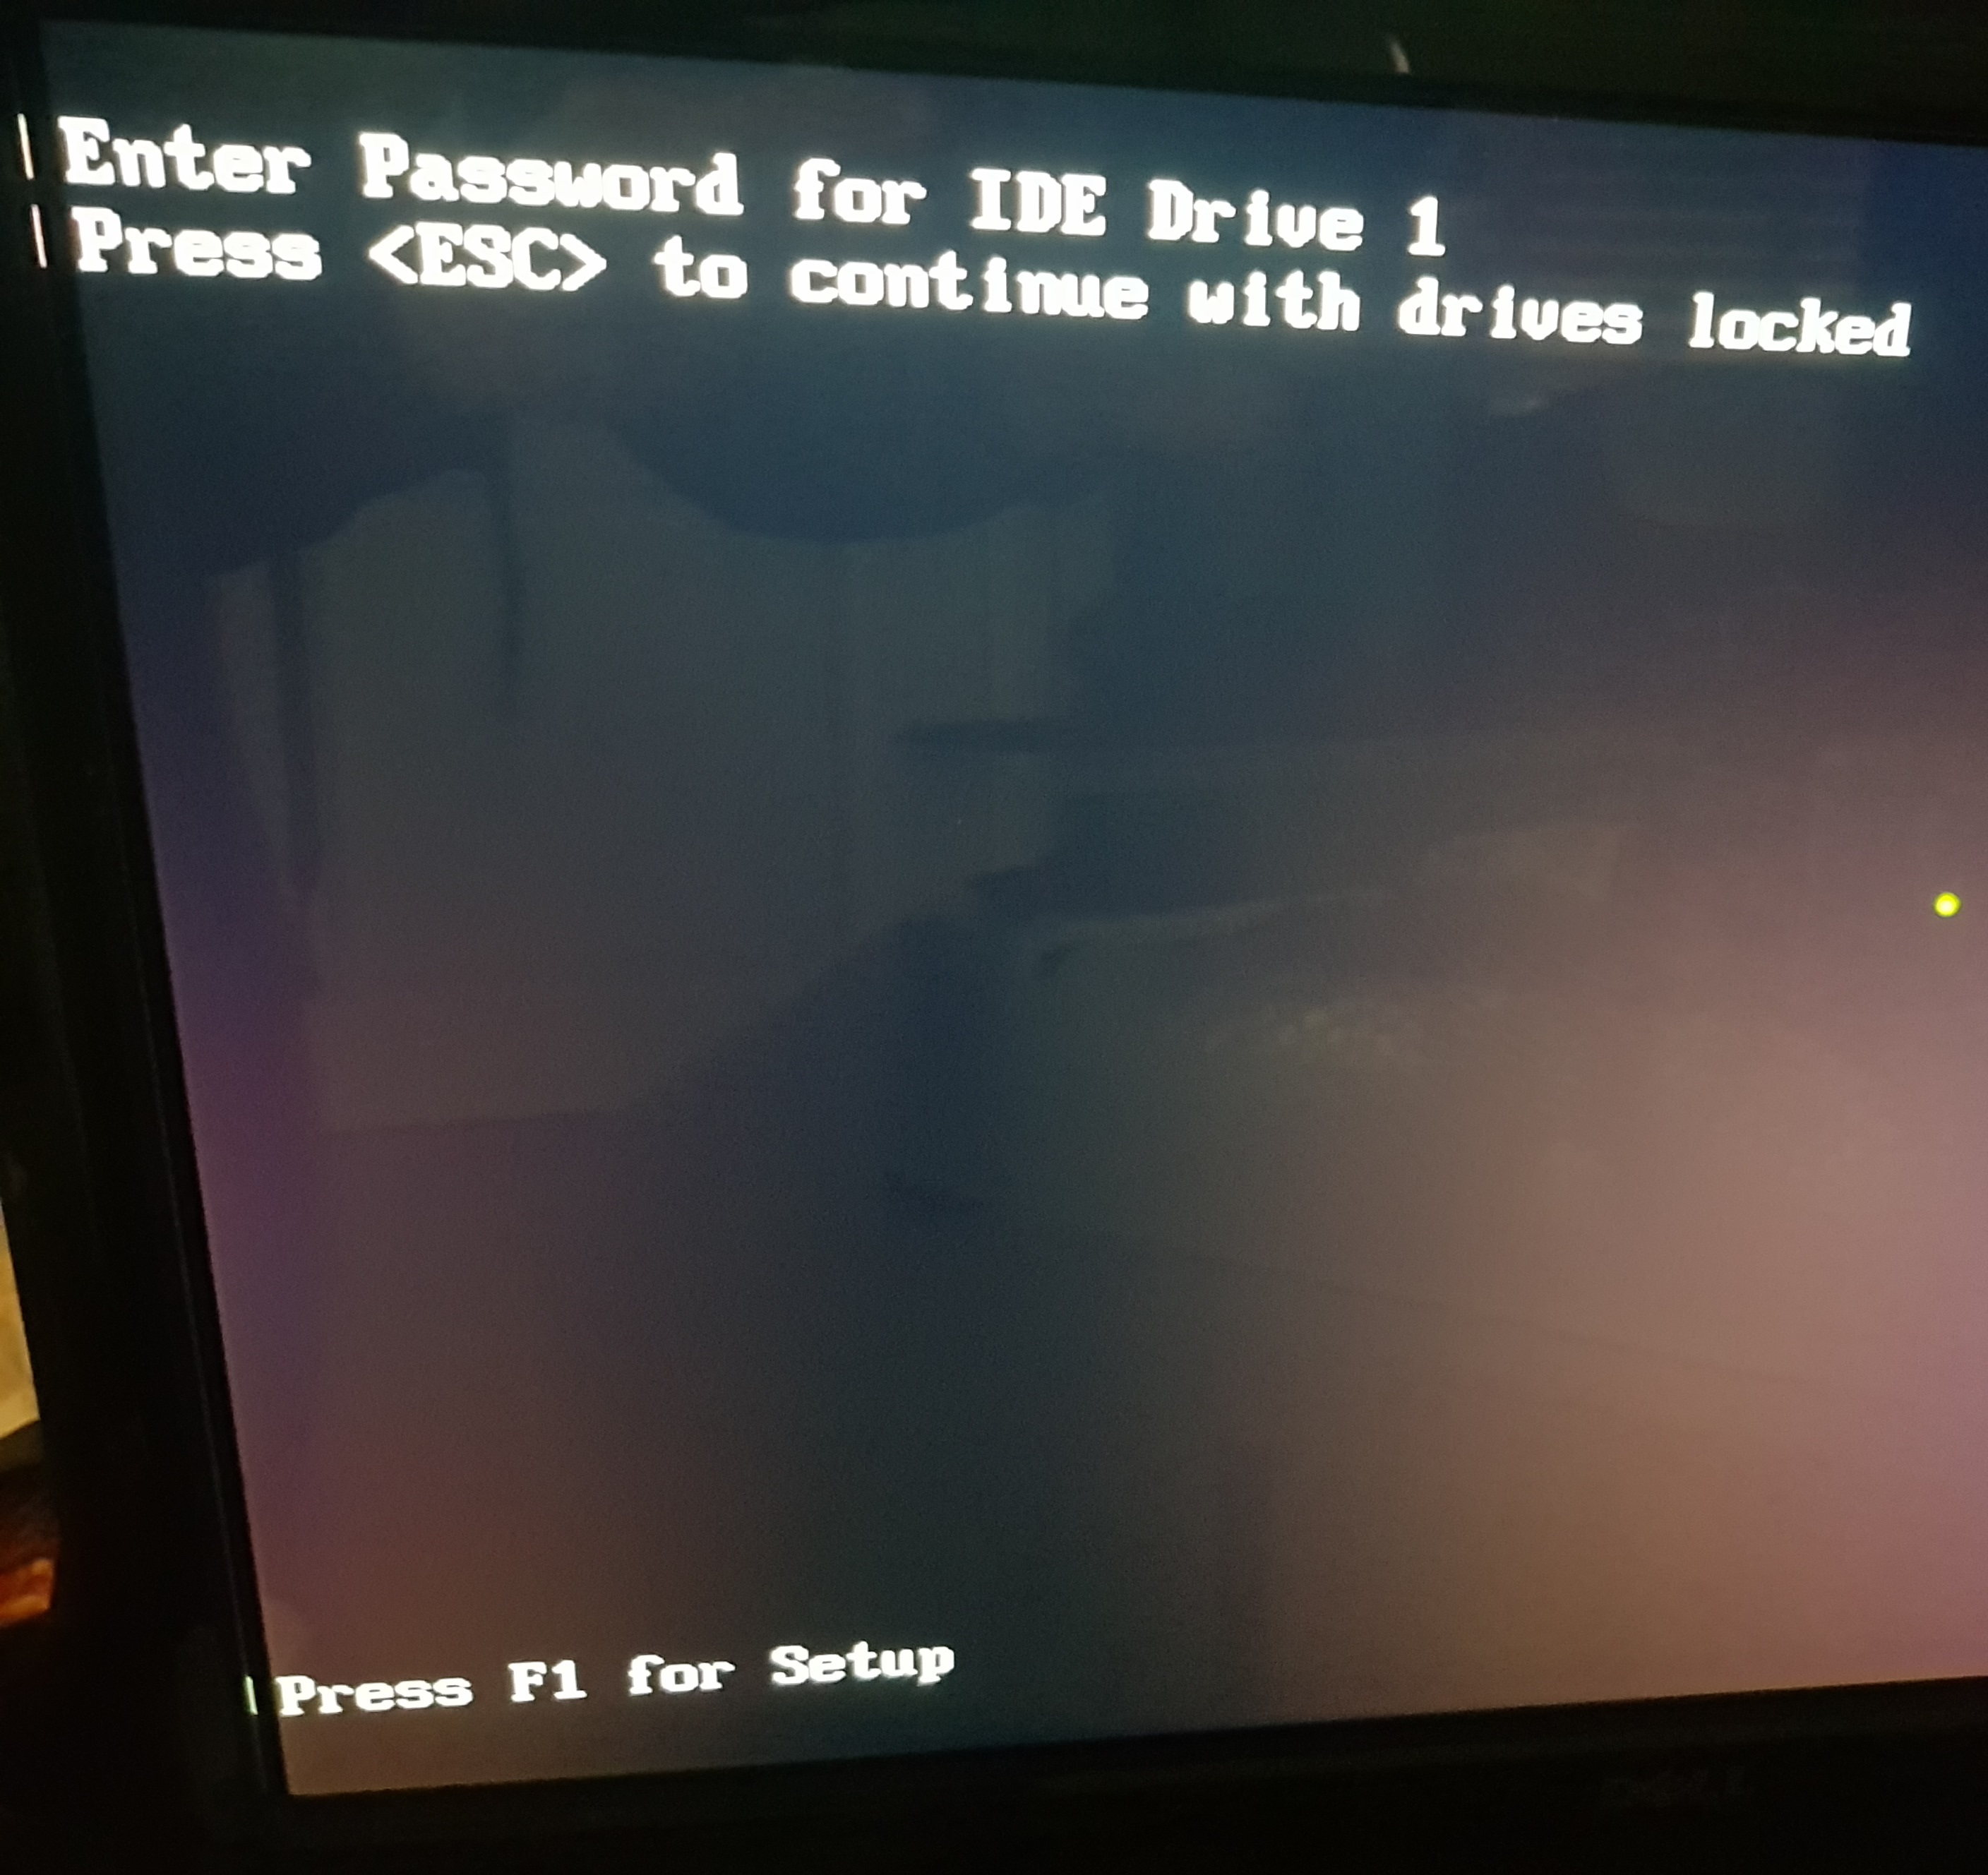
In Windows you get the ‘Data error (cyclic redundancy check).’ error, while the Mint Linux would ask for the password for that particular drive.


Manufacture Master Password
These are the commands you needs, but first you need the master password on which ever HDD manufacture you are using. There is a list of passwords from Forensics Wiki
- Western Digital: WDCWDCWDCWDCWDCWDCWDCWDCWDCWDCW
- Maxtor: Maxtor*INIT SECURITY TEST STEP*F (* means 00h)
- Seagate: Seagate
- Fujitsu, Hitachi, Toshiba: 32 spaces
- Samsung: tttttttttttttttttttttttttttttttt
- IBM:
- CED79IJUFNATIT
- VON89IJUFSUNAJ
- RAM00IJUFOTSELET
Command
Drive Information
sudo hdparm -I /dev/sd[drive letter]
Switching ‘Locked’ into ‘Not Locked’
sudo hdparm --user-master m --security-unlock [Password] /dev/sd[drive letter]
Switching ‘Enabled’ into ‘Not Enabled’ security lock
sudo hdparm --user-master m --security-disable [Password] /dev/sd[drive letter]
Synology
If you still got your Synology, you can telnet into the system.
o [IP Address] [port]
example
o 192.168.1.100 23
Use your admin account to login to the system.
List all drives
cat /proc/diskstats
Find the drive that you wish to poll, then use this command to find which drive letters available could be ‘sda’, ‘sdb’ and so on.
Drive information
sudo hdparm -I /dev/sd[drive letter]
For DSM 6 onwards, to become root do this first.
sudo -i
hdparm -I /dev/sd[drive letter]
You want to gather the drive information, you only need to look at the security section (near bottom), if it’s says the following ‘enabled’, ‘locked’ and ‘Security level high’ which mean it’s locked.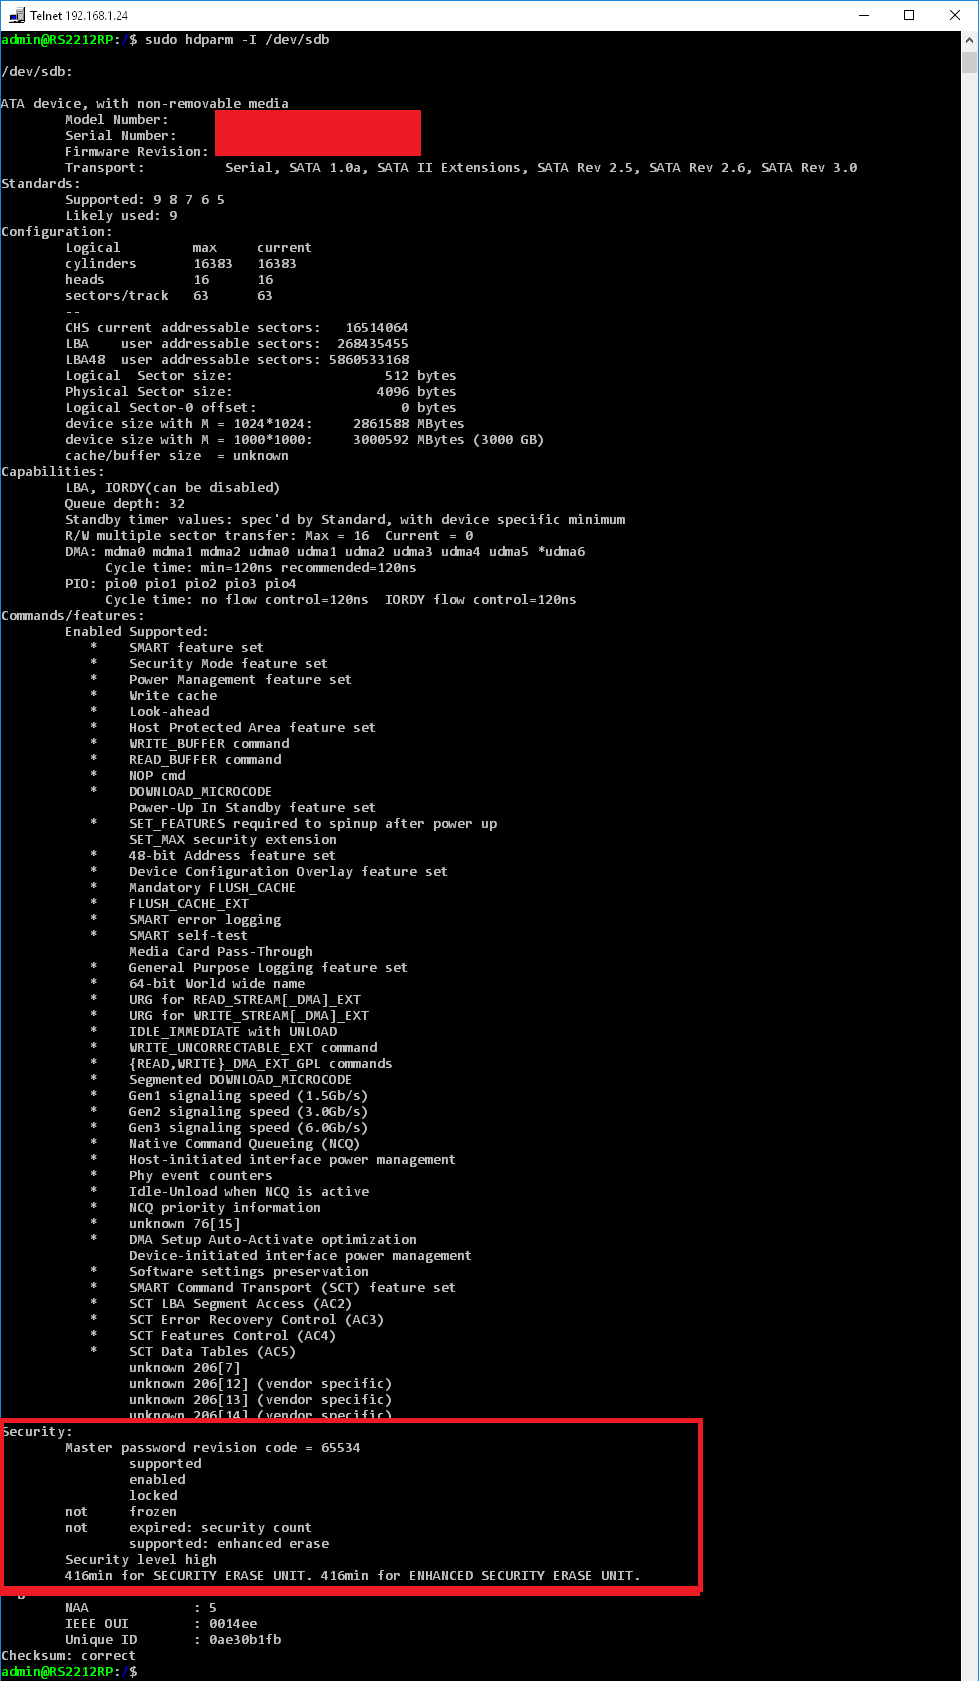
Now run the disable and unlock command
sudo hdparm --user-master m --security-unlock [Password] /dev/sd[drive letter]

sudo hdparm --user-master m --security-disable [Password] /dev/sd[drive letter]

Check the drive information again, you should see ‘not enabled’ and ‘not locked’ and the security level high message disappeared.

Linux Mint Distribution
If you don’t have an Synology you can use a bootable Linux Operating System, I recommend Linux Mint download their popular edition “Cinnamon 64-bit edition” on their download page.
Please note that you connect the drive directly using SATA not via USB as I could not send the command correctly.
Get Rufus which is the best software to make bootable USB, it’s very tiny and very simple to use. I just download the portable version, and just loaded the ISO Image using the CD disk image icon next to “Create a bootable disk using”. Remember that all data will be deleted ensure you select the correct USB device to start with.

Boot that USB, and open terminal once Mint loaded.
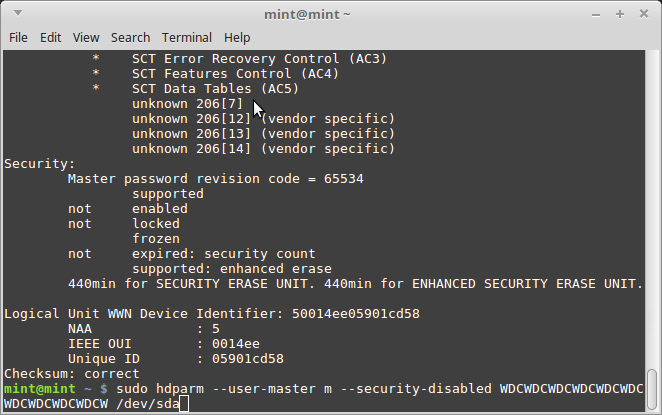
Display drive information and check out the security section. For this example it was the only drive so I know it’s ‘sda’
sudo hdparm -I /dev/sda

You can see that the security is ‘enable’, ‘locked’ and ‘Security level high’.
Run
sudo hdparm --user-master m --security-unlock WDCWDCWDCWDCWDCWDCWDCWDCWDCWDCW /dev/sda


sudo hdparm --user-master m --security-disable WDCWDCWDCWDCWDCWDCWDCWDCWDCWDCW /dev/sda
Eventually you get this

To avoid using secure erase you can just send command to write the whole drive with zeros or random bit.
Zeros
sudo dd if=/dev/zero of=/dev/sd[Drive letter] bs=16k
Random
sudo dd if=/dev/random of=/dev/sd[Drive letter] bs=16k
fantastic post, however, note that the commands to remove the password and the security need “sudo” in front of them. in your post, the first time the commands appear, the sudo is missing and I typed as is and it didn’t work, said wrong password. so i scrolled down and then i copy/pasted the second iteration under the mint instructions and it worked fine.
Hi Tim, just updated the post to include ‘sudo’ on all commands, I believe you only need to state sudo once on Synology then provide a password and you become root from then onward. Though being root has changed from Synology DSM 6 onwards, I’ve also updated the forensicswiki link to their new domain https://forensicswiki.xyz/. Glad that it works for you, this post is quite old.
This saved my week-end, crazy. Why does secure erase lock a drive ?
One point, in the forensics you put one character too much at the end …
Cheers
Mike
Glad that it helps you Mike, oddly forensics has been wrong all this time. I think I’ve corrected the code when I was experimenting with unlocking my Western Digital. I believe the secure lock was just a half bake process that was a great idea at the time, but as you can tell it’s useless.
Any way to gain access to seagate hdd which has the master pswd changed ( I don’t care about the user’s data)?
Hiya, the master password cannot be changed, you use it to unlock the drive that was set by the user password. This would erase all data and allow you to use the HDD. You may have to get/ask Seagate what is the master password, for newer drive as this list is very old.
From what I know you can set a user password to secure the drive, but there is also a master password embedded inside the firmware to allow people to regain control of lost password HDD.
Please note that laptop may not be able to send the master password to the HDD, so external HDD or caddy doesn’t work.